I ran into an issue at work, where the iLO lost all its settings after a hardware intervention. The host was running fine and the iLO NIC was connected, but the IP configuration was missing. Because this is a remote site, it would be easy if the configuration could be set from within ESXi. Luckily, this is a possibility!
Installing the tools
The first thing we need to do is download the VIB from the HPE website. You can find the tools if you search for “HPE Utilities Offline Bundle”. Download the latest zip file, for your specific version of ESXi, and upload it somewhere on your ESXi host.
Next, install the bundle using this command;
esxcli software vib install -d /tmp/HPE-Utility-Component_6.5.0.10.7.1-8.zip
The result will look something like this

Reboot the host after the installation. Once the host is back, you can verify that it is installed by running the following command. The output should look like the picture below.
esxcli software vib list | grep hpon*

Listing iLO configuration
Now that we have the tool available, we can check the current configuration of the iLO. First, change the directory to /opt/tools, which is where the tool is installed to. Next, run the following command to export the active config to a txt file.
./hponcfg -w /tmp/ilocfg.txt
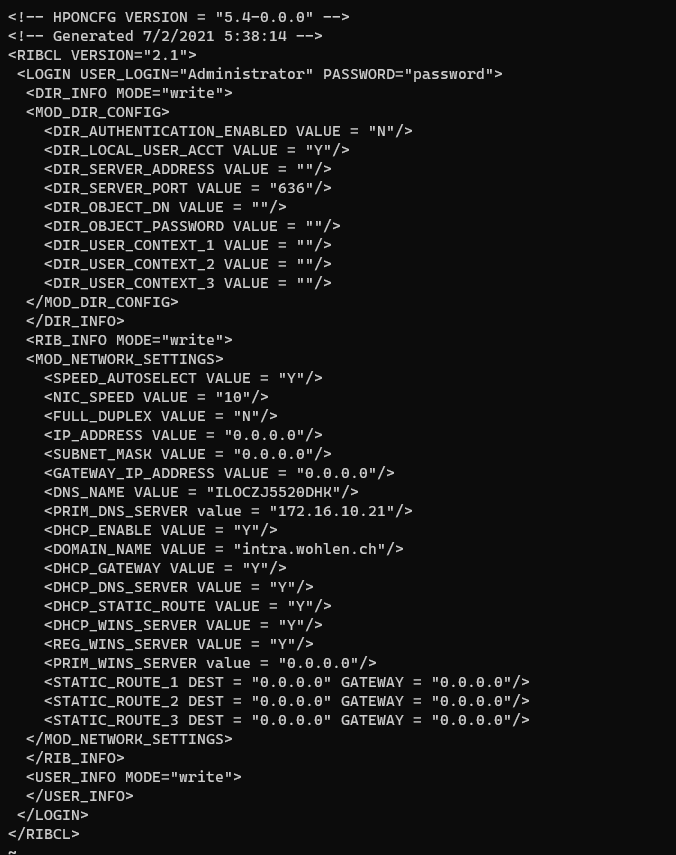
Looking at the exported configuration, you can immediately see what’s wrong, in our case the iLO configuration is completely empty.
Changing the iLO configuration
To change the configuration, we can just make the required changes to the exported configuration file. Just use vi to make the required changes.
Once you’re satisfied with the new config, you can apply it by running this command
./hponcfg -f /tmp/ilocfg.txt
You should be able to reach the iLO on the configured IP address. There’s just one more step to do, and that is to reset the administrator password.
To do this, we’ll create a new xml file with the config to reset the admin password. Just create a new file and give it a name that you want, here we’re using admin.xml. The contents of the file look like this
|
|
Now we just apply the config file, like we did before;
./hponcfg -f /tmp/admin.xml
Once the configuration is successfully applied, verify that you can access iLO with the new password. If it works, make sure you delete the admin.xml file as this contains the password in clear text!